Hi,
I am updating my site! Click here…
My new address is castinconcrete.biz

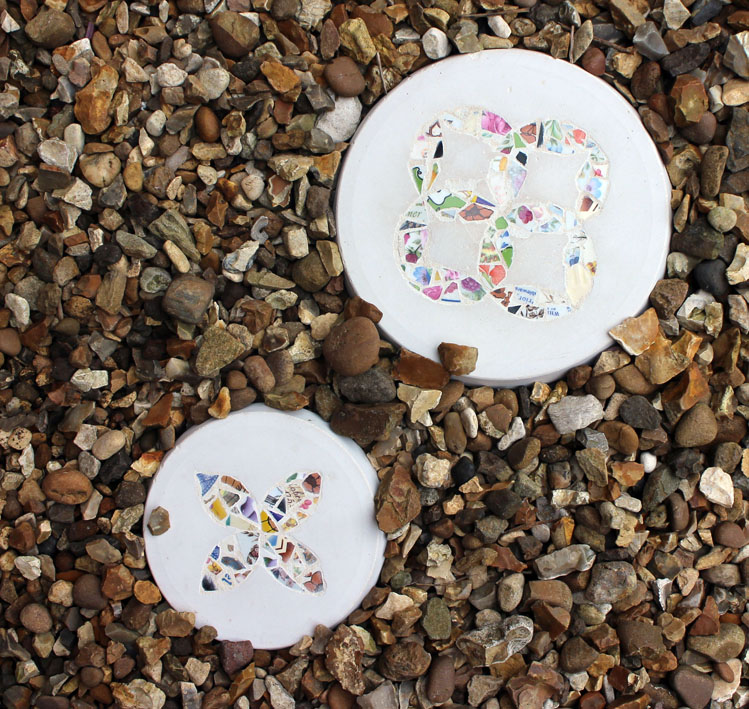
I have made a few stepping stones inspired by traditional patch work design. They can be time consuming depending on how perfect you want your crockery pattern, but not hard to make. A perfect beginners project if you are new to mosaic!
YOU WILL NEED:

Begin with drawing your design inside the mould.
When you are happy, it is just a matter of filling the patterned area with crockery pieces. Bluetac the entire side that are to be attached to your base, and squeeze it down hard, you don’t want any concrete sneaking underneath.


Remember to bluetac the pretty side of the crockery! You are building your mosaic up side down…
You can see instructions on mixing concrete and basic casting here. Don’t forget to be safe. It is important to use googles, a mask and plastic gloves. Breathing in the concrete is dangerous and it can burn your skin and damage your eyes. I always read the manufacturers safety data sheet for further instructions and I advise you to do the same. Be careful as you handle it in both powder and wet form.
After you poured your concrete into the plates it needs to cure. Leave it wrapped up airtight in plastic.
BUT…This project should be checked after ONE day. I mentioned earlier that the concrete can sneak under the crockery if bluetac has loosened slightly in places. That can easily be scraped off and corrected before it has cured fully. Open your plastic covering on the second day, and remove your object CAREFULLY. Remember that it is still soft, and edges can break very easily.
If concrete is covering your porcelain it needs to be scraped of. This is where you can play archaeologist…..Don’t worry to much about marks, as they will be grouted over in the next step! Recover the stepping stone airtight in plastic as soon as you have finished. You need to water the concrete before closing the parcel again. Just pour some water on it. It will drip of, but moisture will remain in the bag.
Concrete dries out your skin. It can also still be curing even if it is hard to touch. Curing concrete can corrode your skin and cause serious burns. Therefor you should always wear your plastic gloves as you remove items from moulds, sand them, scrape them or handle them.
I would leave it in the bag for at least three days. Have a critical look at your piece as you take it out. The crockery might stick out in places and the edges can be sharp. What you need is a layer of grout. Mix the grout with a little extra sand. I use 1 part snowcrete to 3 parts sand. Slop it on, rub it in and remove the excess with a towel. Now all you need is to wrap it up again to dry slowly, and you are done!


I want to make concrete frames. Above is my first experiment!! Frame is cute, but the photo in it is a print out so you have to imagine it with a crisp print and maybe even a glass in front…they will be great!!
This one was straight forward. An IKEA plastic frame we used to have in the kitchen. It never really felt right after we repainted, so I opened it and found a hollow – almost perfect – mould. The idea was to have a variety of frames though, and they wont all be hollow…so I have ordered a container with silicon rubber. Keep your fingers crossed and I might be an expert rubber mould maker next week 🙂
It came out in a sandy colour, and even if you cannot see it from the photograph, very fragile and grainy surface. I tried a new mould release agent and it reacted with the concrete. I am hoping my next attempt to come out smooth and pale. I have sealed the fragile concrete with PVA, but the colour is unchanged.

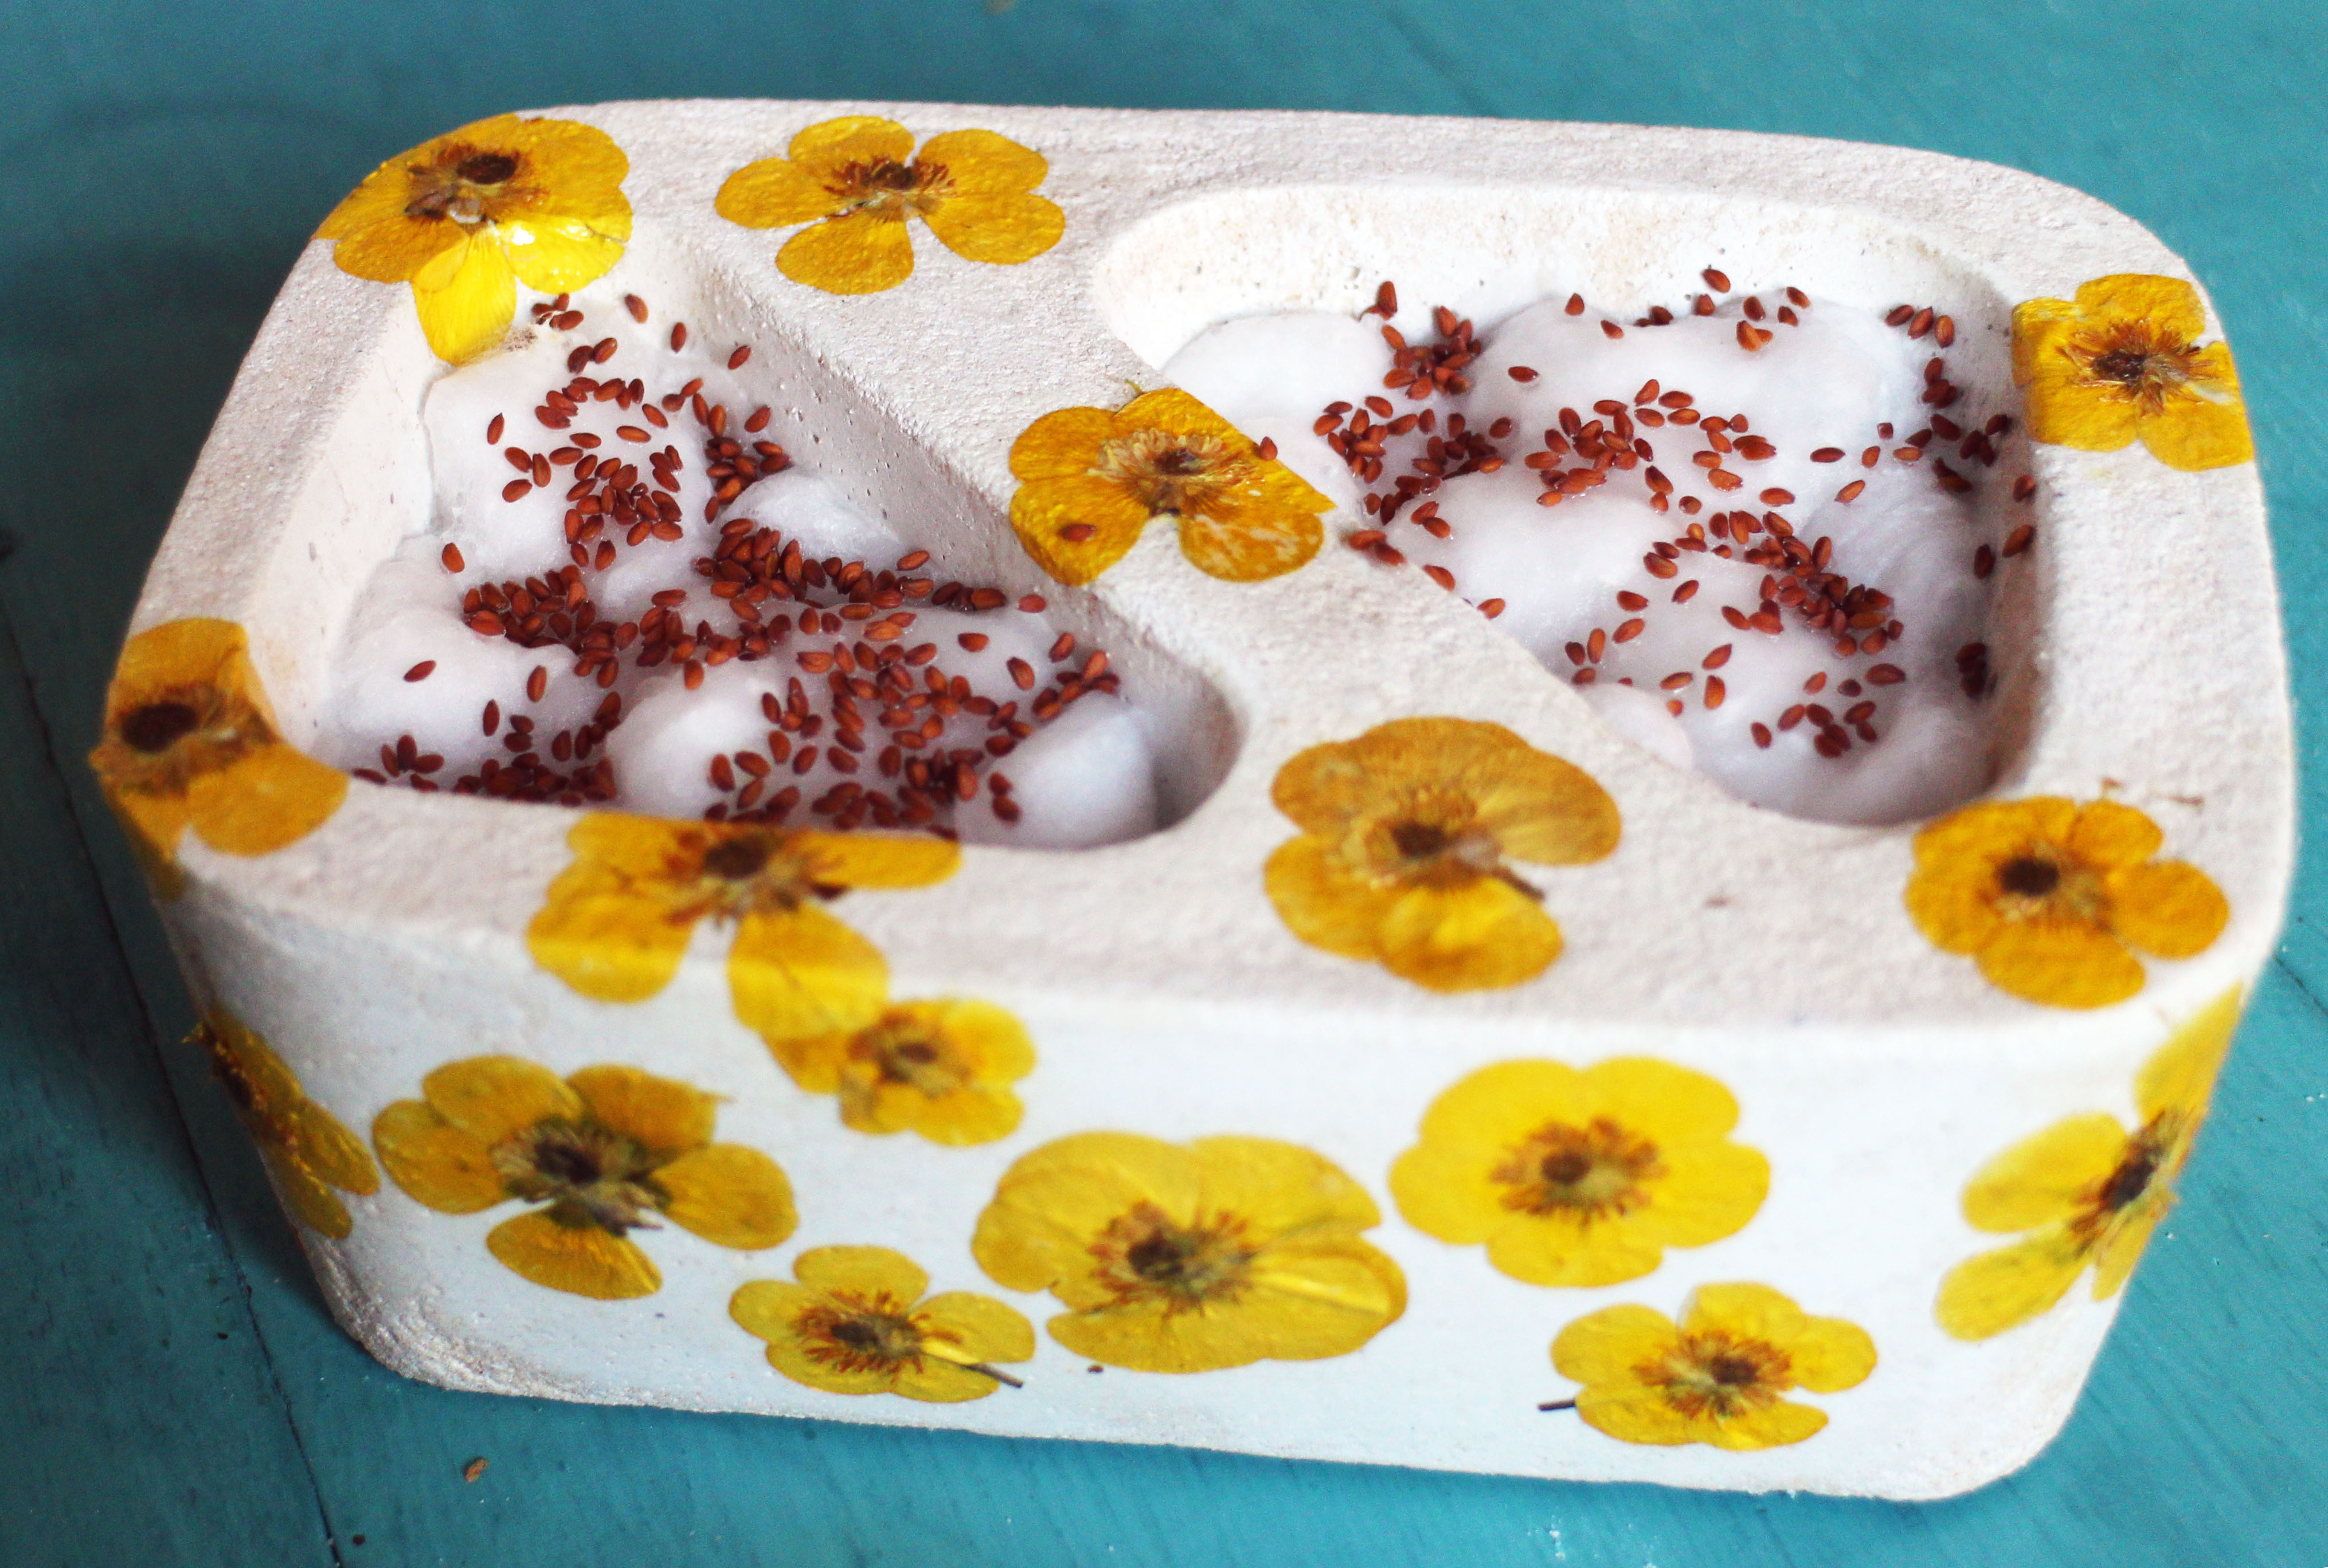
I have been making a pot for cress! The thought was to keep it on the kitchen table with two separate sides both growing sandwich cress. The one side can grow as the other is being eaten….I think the little green sprouts will look great against the yellow buttercups.

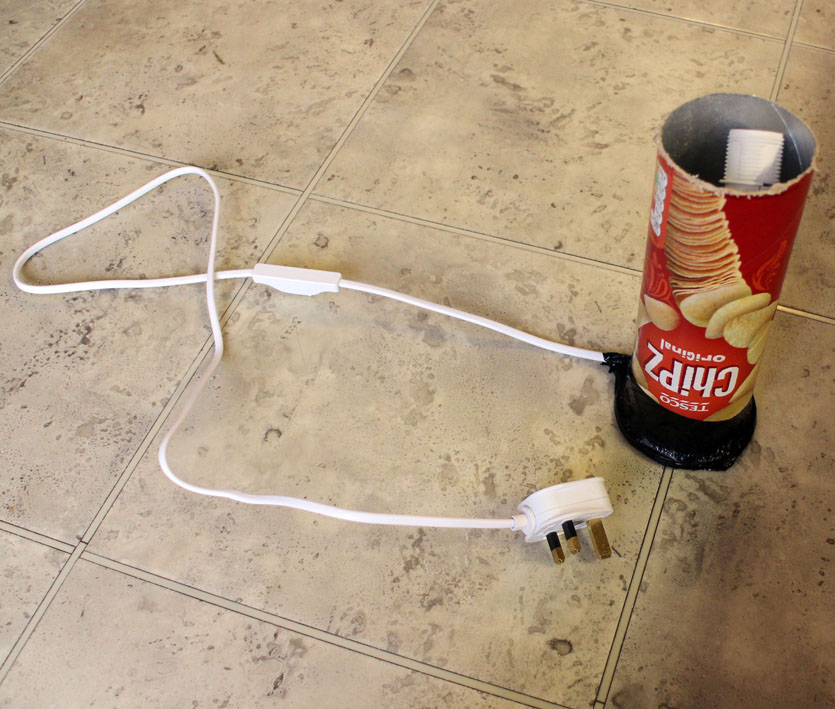
I thought it was time to be a little more adventurous! I had a pair of broken – and badly glued together – bedside table lamps in our guest room. This is the first one.
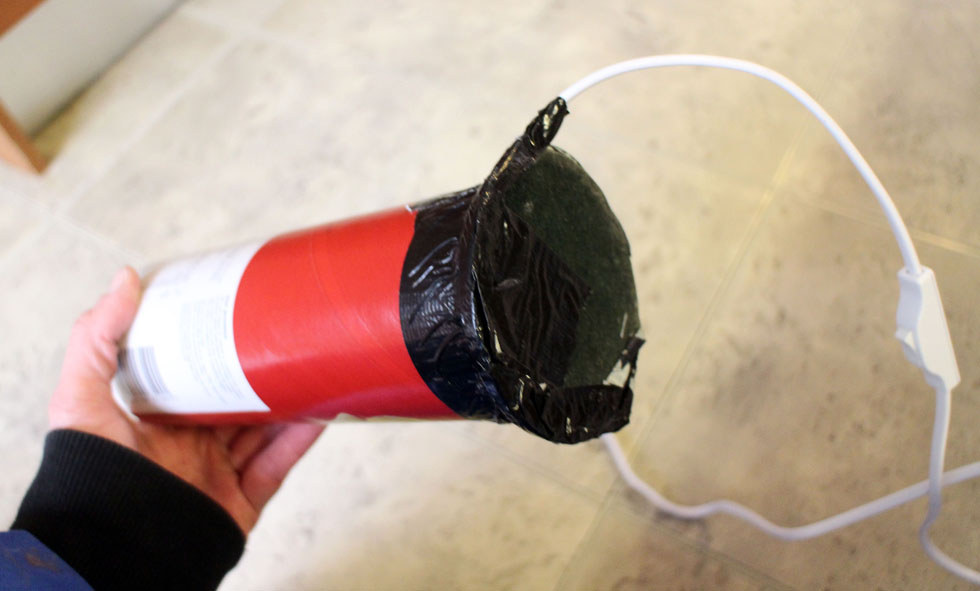
I started by taking out the hammer and breaking it properly. The plan was to use the wire, and all the lamp fastenings, but to update the broken shell. I ended up casting a new foot in an old chips tube and I modelled a new shade by covering the old metal inside in a concrete dipped jumper sleeve.


First, I cut off the top of the tube. Then I made a whole at the rim (for the wire to go through) and attached it, watertight, with heavy duty tape to a flat bottom. I taped it up with the wire and lamp base, and made sure that the wire was just long enough to allow the plastic base to peek out of the concrete at the top. It sounds complicated, but have a look at the photographs below.

I also cut off a piece of jumper sleeve to wrap around the shade metal skeleton. I allowed it to be skew, in order to make it stand out against the strict straight cylinder foot. In hind sight, maybe a little too wonky 🙂
I then did my concrete cast and dip! For more information on how to mix and cast in concrete, including safety advice, look at my basic instruction. If you want to read more about how to dip a fabric item in concrete, look at my doily dip instructions.
After letting my two little packages cure airtight for a week, it was an easy job assembling it all. I will try to make a sphere lamp shade on the second one. This one is cute, but it needs more of an edge.


There are so many broken little plastic toys floating around our house. Perhaps all boys are born with magnetic powers attracting plastic in all shapes and sizes. I sneak them out systematically every time I clean the house, and they bring them back from restaurants, parties or from just walking down the street…
I have a secret bag where they go to retire instead of the bin. The bag is gold for rainy day arty projects! This is a stepping stone we made last year. I prepared a little box with concrete, kitted my then 8 year old in safety goggles, massive plastic gloves and an overall, and let him go loose on squeezing toys into the mixture.
BE SAFE. It is important to use googles, a mask and plastic gloves. Breathing in the concrete is dangerous and it can burn your skin and damage your eyes. I always read the manufacturers safety data sheet for further instructions and I advise you to do the same. Be careful as you handle it in both powder and wet form.
Concrete dries out your skin. It can also still be curing even if it is hard to touch. Curing concrete can corrode your skin and cause serious burns. Therefor you should always wear your plastic gloves as you remove items from moulds, sand them, scrape them or handle them.
You can find all the information on how to mix your concrete in my beginners lesson.
It might not be so comfortable to step on…but it looks cute!
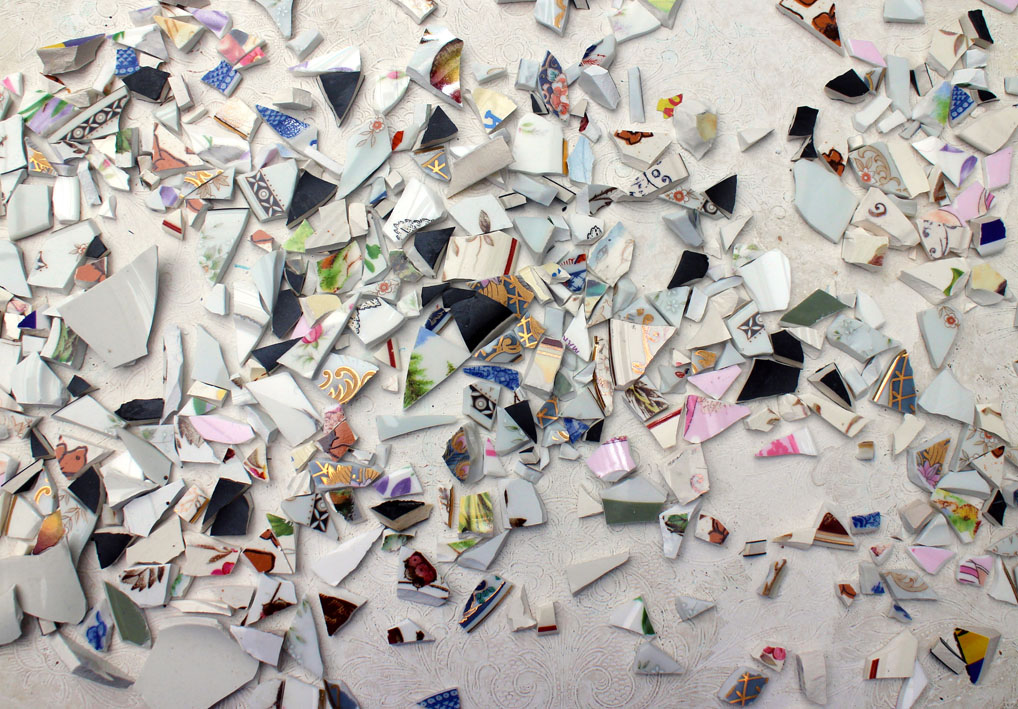
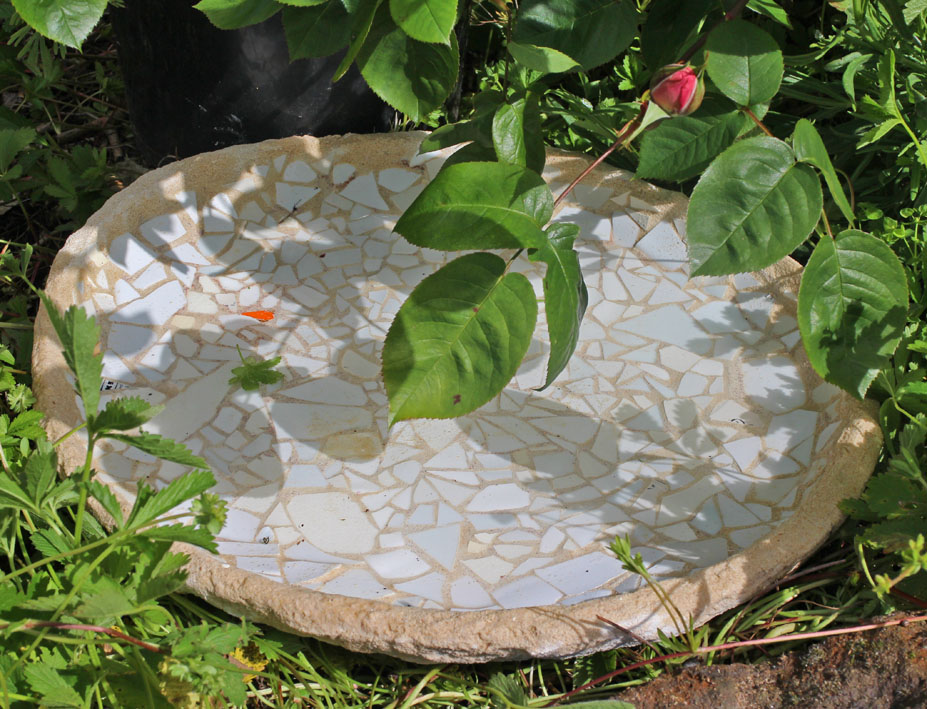
I use a lot of old crockery for mosaics and have saved up broken plates for years. But it is always the pretty bits that gets used. I wanted to make an object using only the blank white pieces.

MATERIALS:
The first thing you have to do is a sand mound. Decide how deep you want your birdbath and mould that shape. Then you can start squeezing crockery into the sand surface. Spray water on the sand if they don’t stick in place. Try and match your pieces up as tightly as you can.

Don’t forget that you are turning your crockery pieces up side down. The side facing the sand mound, is the side that will be visible later on. Be careful with the edges, you want them to look good!
Mix your concrete. You need to use one part Snowcrete to two parts sand. Start with stirring the two together well before adding the water. Add small quantities of water at a time. It is easy to make concrete to thin. Aim for the consistency of a solid porridge. You don’t need a large mix. It is heavy work mixing concrete in great quantities, but very easy in small batches.
Be safe. It is important to use googles, a mask and plastic gloves. Breathing in the concrete is dangerous and it can burn your skin and damage your eyes. I always read the manufacturers safety data sheet for further instructions and I advise you to do the same. Be careful as you handle it in both powder and wet form.
Plop it on little by little. You don’t want to disturb the pieces as you go along, so be light handed.


Keep an eye on the thickness. A birdbath doesn’t need to be nimble, It needs stability.

It needs to be wrapped up in plastic so not to dry tot quickly. Concrete dries harder if it dries slowly. Wrapping it up the concrete air tight as it cures, will add a few days to the process and therefor increase the quality and strength of your final piece. Leave it for a minimum of four days, lift it off and scrub it clean. Most of the sand will come off, but it will look a bit rough at this stage.
Concrete dries out your skin. It can also still be curing even if it is hard to touch. Curing concrete can corrode your skin and cause serious burns. Therefor you should always wear your plastic gloves as you remove items from moulds, sand them, scrape them or handle them.


The edges will be uneven and the crockery sharp. What you need is a layer of grout. Mix the grout with a little extra sand. I use 1 part snowcrete to 3 parts sand. Slop it on, rub it in and remove the excess with a towel. Use the grout to sculpt the edges smooth. It is not hard, but takes a little patience.

Wrap it back into plastic when you are happy and let it dry slowly.

I ‘planted’ my new stepping stone yesterday. The kids love it!!
I used an old star wars mask as the mould. All it needed to prep it was a little gaffa tape to cover the air holes. Easy piecy lemon spueezy!


I was so happy with my Doily bowl the other week and decided to experiment further. I tried a thinner concrete mix, so I might have to strengthen them in a re-dip.
I found two small round doilies, so bright green that the colour will shine through the thin concrete in places. I also found an old crocheted place mat. I hope that the square shape will come out well…watch this space! I’ll probably leave them wrapped up for a week or so!


I had an old set of Jelly moulds that were going in the bin. They have been well used but some of the lids are lost over the years. I love the shape, so I decided to cast them in concrete. This small size is perfect for candle holders and their wide flat base makes them safe to use.

MATERIALS:
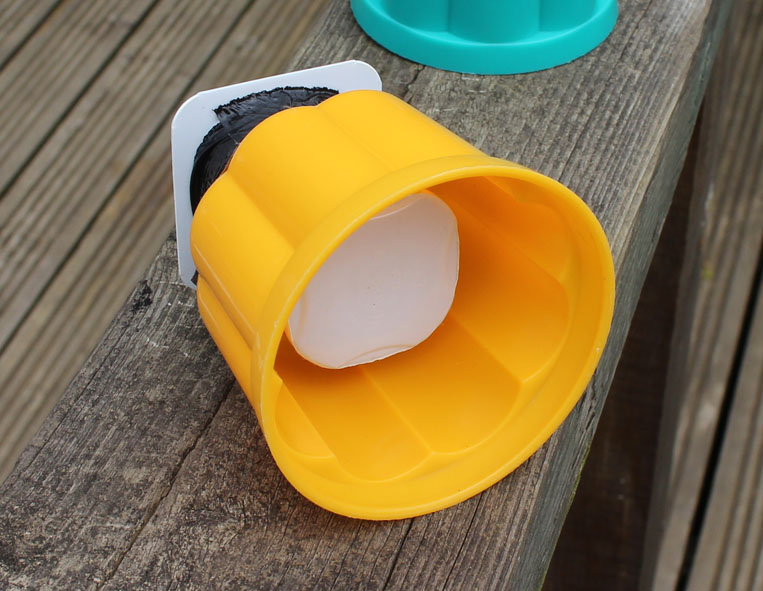
I was really lucky. I had some little yoghurt pot containers in my recycling bin. They were small enough to fit perfectly into the little whole at the top of the plastic mould.
Insert the yoghurt container upside down into the base of your jelly pot, and tape it in place. Use plenty of heavy duty tape and make sure the edge is water tight. Remember that no tape should be on the inside of your mould, as that would create ugly marks. The depth of the inserted yoghurt pot will determine how deep your candle will sit in your final holder. I made a set of four holders as I had several jelly pots, so I had to be careful to get the exact same depth on all four. Preparing the mould well is vital when casting a product. It is hard to make changes once the concrete is poured.

Prepare your area. You want to cover the ground with plastic. Place the prepared moulds upside down inside of an opened bin bag. Concrete dries harder if it dries slowly. Wrapping the concrete air tight in a bin bag as it cures, will add a few days to the process and therefor increase the quality and strength of your final piece.
Be safe. It is important to use googles, a mask and plastic gloves. Breathing in the concrete is dangerous and it can burn your skin and damage your eyes. I always read the manufacturers safety data sheet for further instructions and I advise you to do the same. Be careful as you handle it in both powder and wet form.
Mix your concrete. You need to use one part Snowcrete to two parts sand. Start with stirring the two together well before adding the water. Add small quantities of water at a time. It is easy to make concrete to thin. Aim for the consistency of a solid porridge! You don’t need a large mix. It is heavy work mixing concrete in great quantities, but very easy in small batches.
Plop in the mix. Vibrate the mould in your hand as you are filling it. Keep vibrating and tapping and you will see air bubbles rising to the surface. The more bubbles you get rid of at this stage, the smoother your surface will be. I have attached a montage of two pictures below. It is two of the holders after I removed them from their moulds. You can see that one is smoother and that the other has a large amount of markings from trapped bubbles.

Seal the bin bag around your casted objects. Leave them alone for three or four days.
Removing an object from a mould is the best part of the process. It is so exciting to finally see the result! But it can be a little tricky. A water bath can help releasing the object. Sometimes it is enough to insert a knife or similar around the edge, bending slightly. In this case I started with removing the yoghurt pot, which allowed access to push the concrete out from that end.
Concrete dries out your skin. It can also still be curing even if it is hard to touch. Curing concrete can corrode your skin and cause serious burns. Therefor you should always wear your plastic gloves as you remove items from moulds, sand them, scrape them or handle them.
There might be air bubbles or other blemishes. Sometimes you end up with a damaged edge from bending the object out of the mould. Some of these marks can add beauty, and some are unwanted. You can use polyfilla to fill air bubbles, cracks or scratches.

